Azure Machine Learning Studio is a GUI-based integrated development environment for constructing and operationalizing machine learning workflows. The basic computational unit of an Azure ML Studio workflow (or Experiment) is a module which implements machine learning algorithms, data conversion and transformation functions etc. Modules can be connected by data flows, thus implementing a machine learning pipeline. A typical pipeline in Azure ML Studio is shown below:
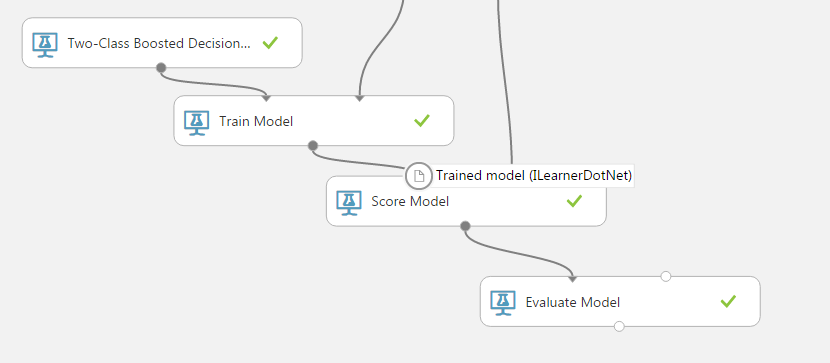
In the figure above, a native Azure ML Studio model (Two-Class Boosted Decision Trees) is connected successively to a Train Model which performs the training procedure, to a Score Model to predict the outcome on test data, and finally to an Evaluate Model that will assess the overall classification quality.
Microsoft currently offers an option for a Create R Model module, which allows for creating custom ML models written in R and integrating them into Azure ML Studio pipelines, hence opening up a vast area of possibilities. However, currently the Evaluate Model module cannot be used with a Create R Model module (i.e. through the pipeline: model -> train -> score -> evaluate); quoting from the documentation:
Warning:
Currently it is not possible to pass the scored results of an R model to Evaluate Model or Cross-Validate Model. If you need to evaluate a model, you can write custom R script and run it using the Execute R Script module.
This is not good news for a couple of reasons: the quality of a Create R Model module cannot be assessed uniformly and cannot be directly compared to native Azure models (Evaluate Model is used for comparison purposes too, as we will demonstrate below); hence, the user is forced to create custom comparison scripts, which is a tedious and non-standard process. Also, the Evaluate Model module offers handy out-of-the-box visualizations, which we would like to have available as they can help rapid prototyping. Finally, it is much more straightforward to save trained models in the Azure ML Studio workspace (without the need to work directly in an Azure blob storage) using the Create R Model module rather than the alternative option of Execute R Script.
So, in this post we will present a tweak that bypasses this limitation, allowing the use of an Evaluate Model module with a Create R Model one.
Demonstrating the issue
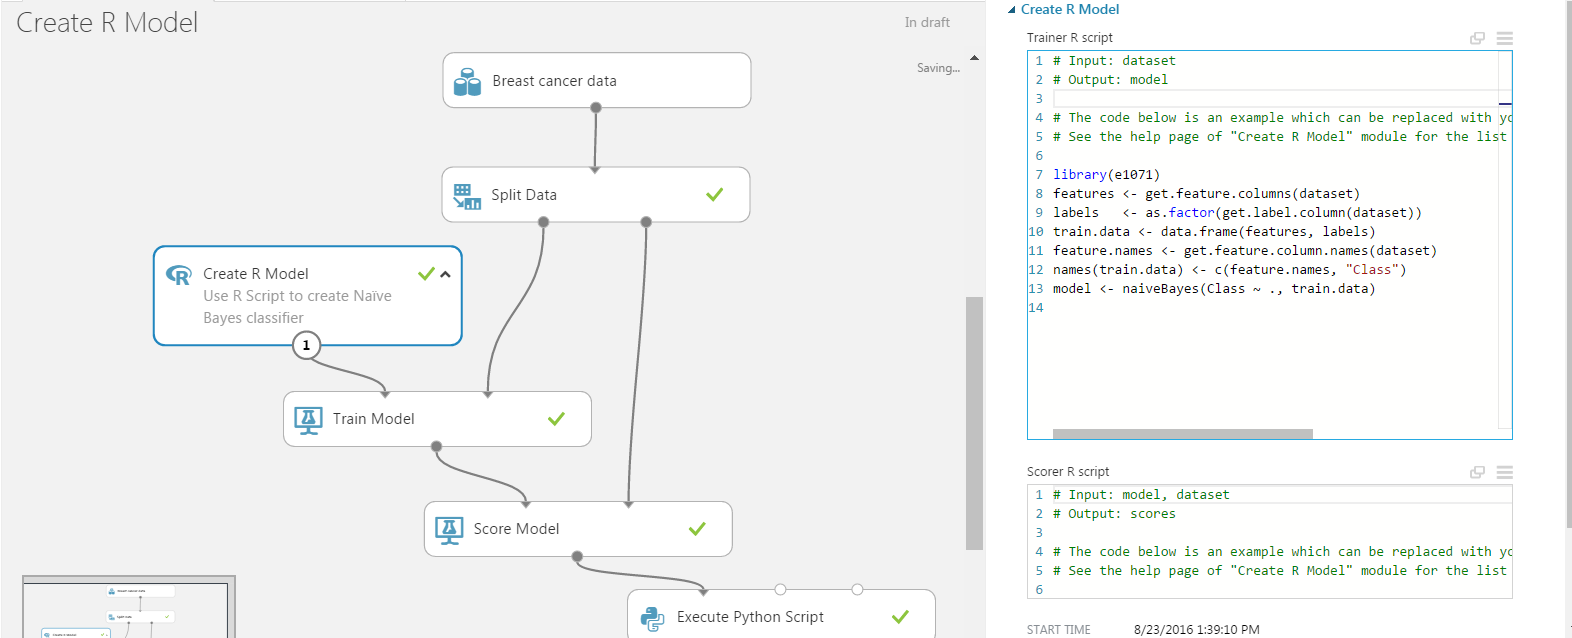
We will use as our staring point an example offered by Microsoft, which uses a two-class Naïve Bayes classifier from the e1071 R package.
Here is the ‘Training Script’ of the Create R Model:
library(e1071)
features <- get.feature.columns(dataset)
labels   <- as.factor(get.label.column(dataset))
train.data <- data.frame(features, labels)
feature.names <- get.feature.column.names(dataset)
names(train.data) <- c(feature.names, "Class")
model <- naiveBayes(Class ~ ., train.data)
and the respective ‘Scoring Script’:
library(e1071)
probabilities <- predict(model, dataset, type="raw")[,2]
classes = 0.5))
scores <- data.frame(classes, probabilities)
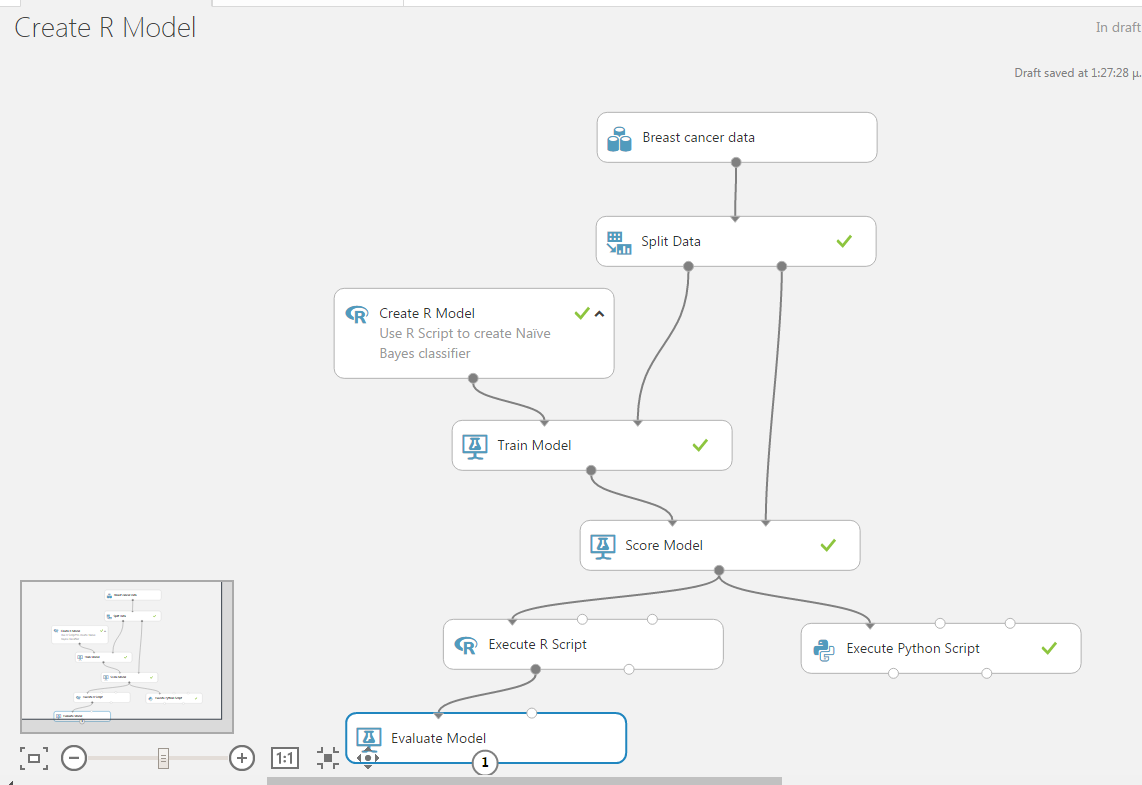
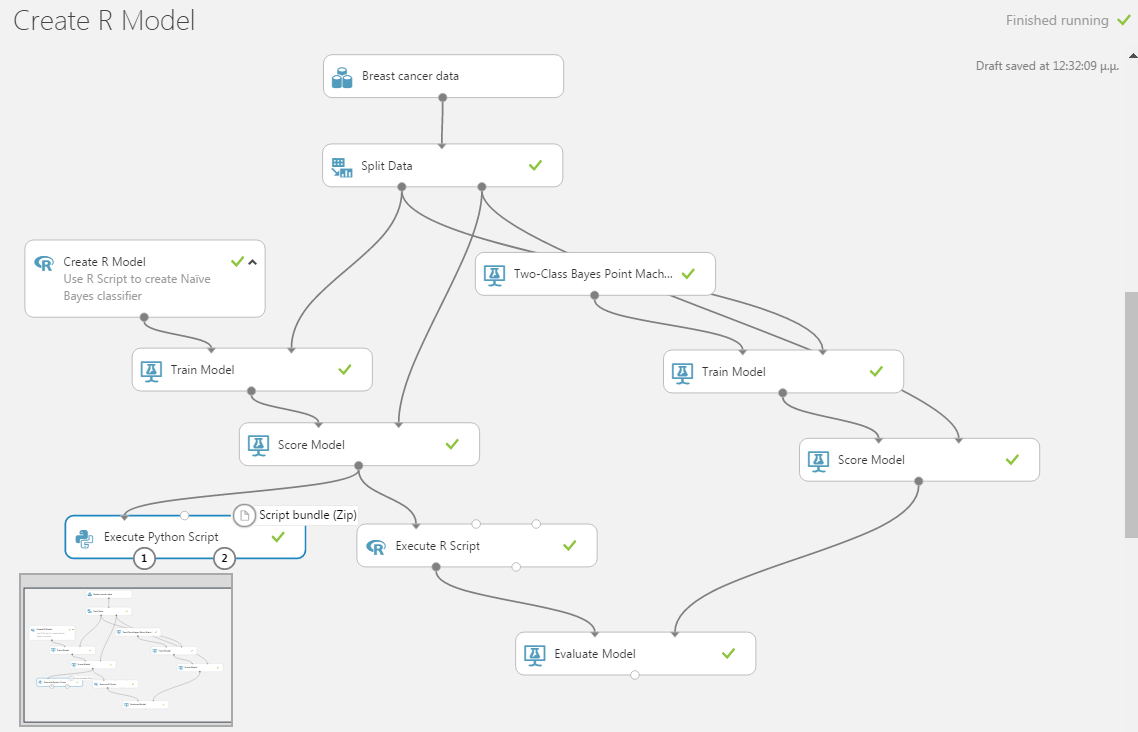
The complete experiment graph is shown in the figure below:
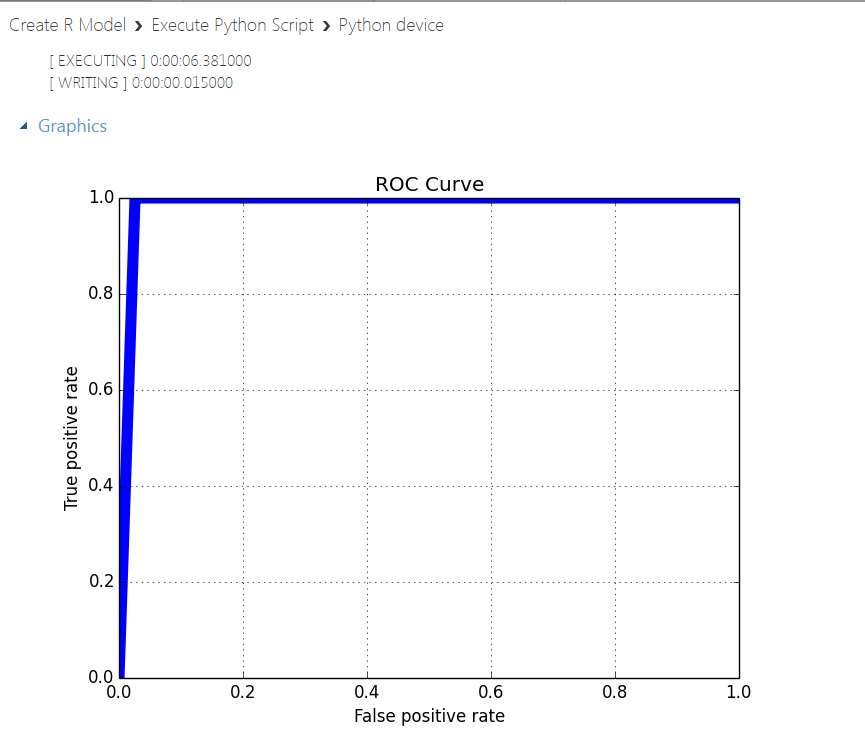
The experiment ends to an Execute Python Script module that facilitates, programmatically (in Python!), the model evaluation. This script calculates quantities like “Accuracy”, “Precision”, “Recall”, and “AUC”, and produces a PNG plot of the ROC curve as shown below:
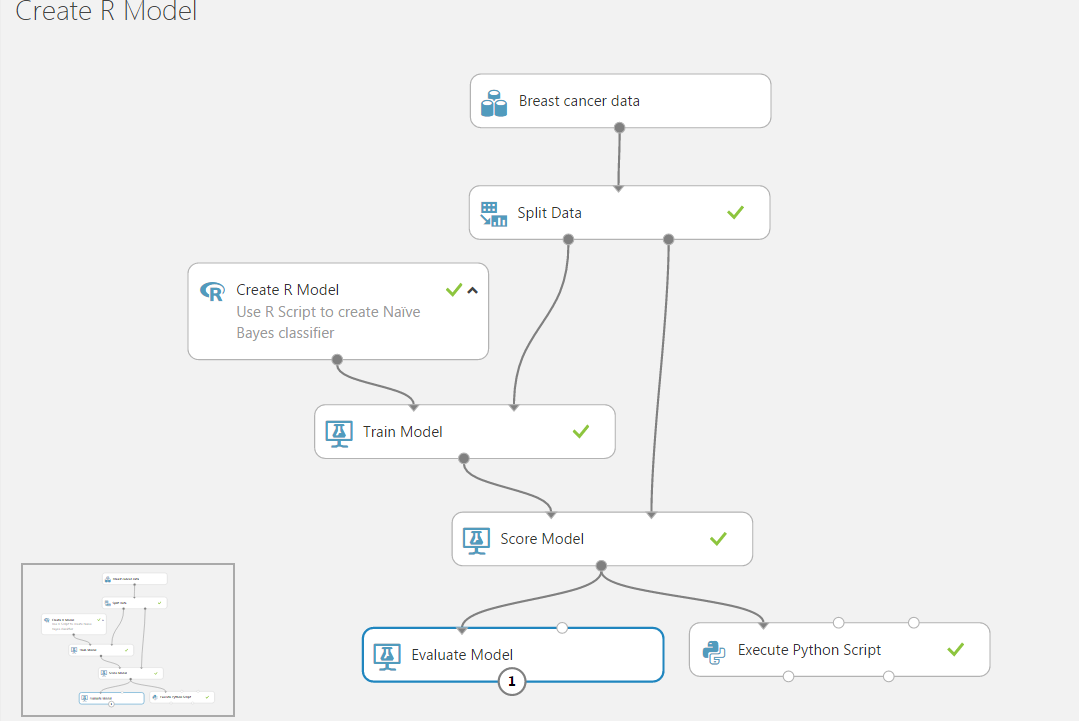
Let us first confirm Microsoft’s warning, by adding an Evaluate Model module and connecting it to the Scored Model like this:
When we try to run the experiment we get the following error:
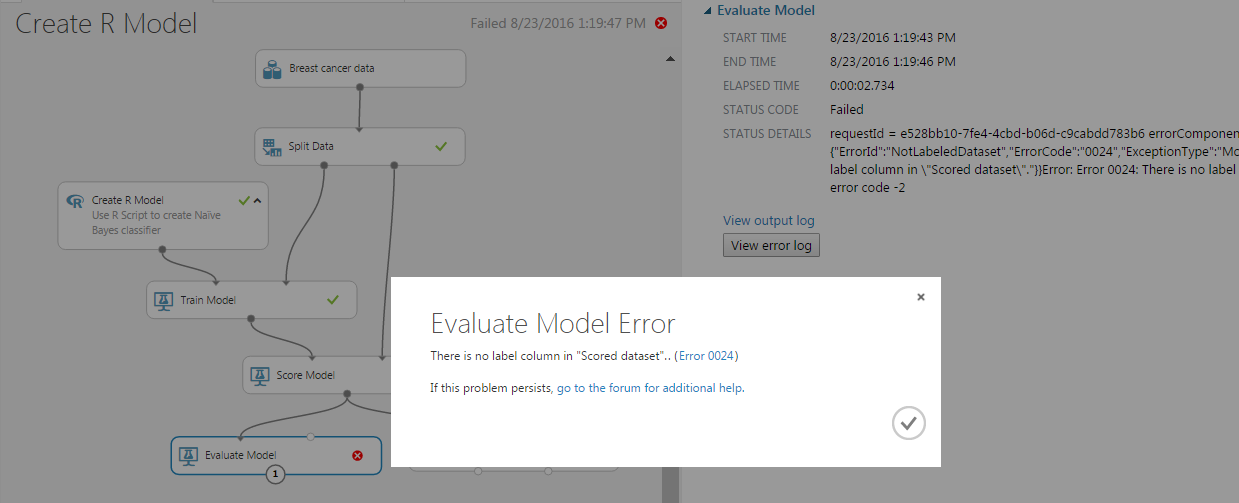
It seems that the data passed from the Score Model to the Evaluation Model miss a special annotation for the scored columns. The error message states There is no label column in "Scored dataset".
Solving the issue
Fortunately R again comes to the rescue. From the error message we deduce that Evaluate Model is missing a label column from the incoming dataset. Score Model on the other hand creates all the necessary information. This indicates a possible metadata issue. The appropriate columns do exist but need to be further annotated. The solution emerges when reading the appropriate metadata documentation. Typical metadata information includes:
- Treating Boolean or numeric columns as categorical values
- Indicating which column contains the true label, the assigned label or the classification score
- Marking columns as features
- Changing date/time values to a numeric value
- Adding or changing column names
We need to indicate these special columns, i.e. true label, assigned label, and classification score in the dataset moved between the scoring and evaluation modules.
The simplest way to do this is by using an Execute R Script as a bridge between the Score and the Evaluate modules. Our experiment now is as shown below:
Before we provide the code of the Execute R Script module, we must make three important observations:
- In the ‘Training Script’ of the example we can see that the classification column (true label) is called
Class - The ‘Scoring Script’ of the example ends with
scores <- data.frame(classes, probabilities). The first corresponds to the assigned label and the second to the classification score - The Score Model module has the option
Append score columns to outputchecked, so we expect the ‘Scoring Script’ to add two extra columns on the input dataset:classesandprobabilities.
The final R script that will bridge the Score and Evaluation modules is as follows:
# Map 1-based optional input ports to variables
dataset1 <- maml.mapInputPort(1) # class: data.frame

#
# Create a three column data.frame with columns
#   true_labels: actual classes
#   assigned_label: predicted classes with threshold set to 0.5
#   calibrated_score: probability output from the Baye's classifier
data.set <- data.frame(true_labels=dataset1$Class,
                       assigned_label=dataset1$classes,
                       calibrated_score=dataset1$probabilities)

#
# Change the "label.type" attribute of column "Class" to be of type "True Labels"
attr(data.set$true_labels, "label.type") <- "True Labels"
#
# Change the "feature.channel" and "score.type" attribute of "scored" column
attr(data.set$assigned_label, "feature.channel") <- "Binary Classification Scores"
attr(data.set$assigned_label, "score.type") <- "Assigned Labels"

#
# Change the "feature.channel" and "score.type" attribute of "probs" column
attr(data.set$calibrated_score, "feature.channel") <- "Binary Classification Scores"
attr(data.set$calibrated_score, "score.type") <- "Calibrated Score"

#
# Rename the columns
names(data.set) <- c("Class" ,"Scored Labels" , "Scored Probabilities")

#
# Export the dataset
maml.mapOutputPort("data.set");
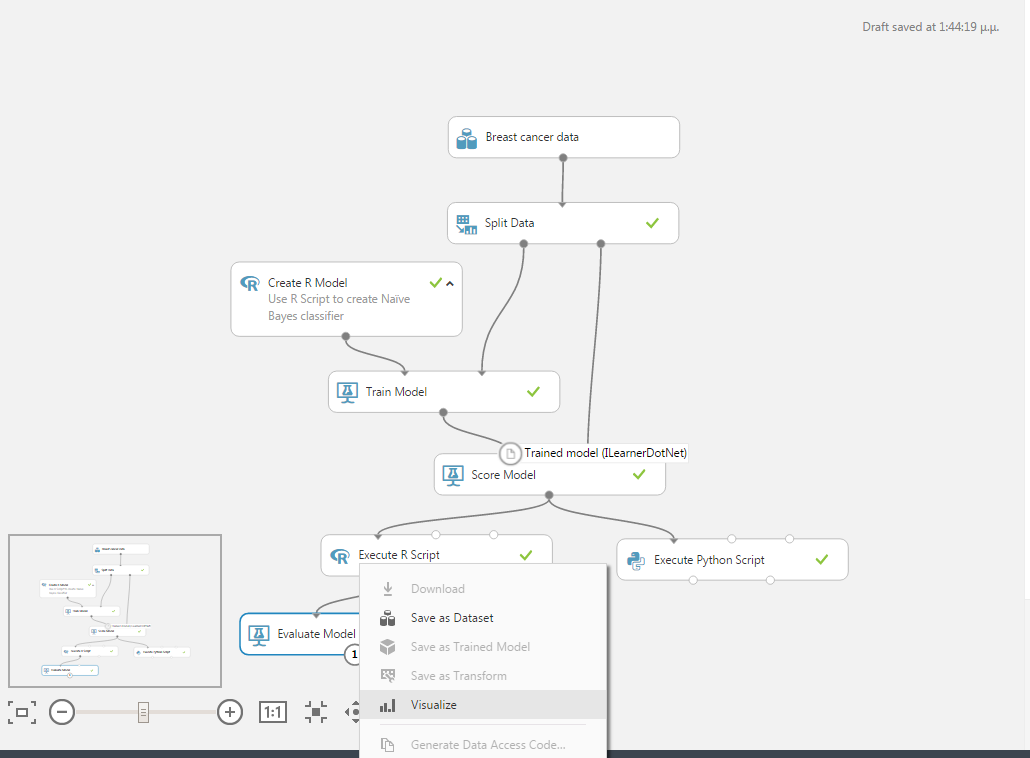
We run the experiment and see that everything works. The Evaluate Model module is now operational, and we can click to visualize:
The result of the visualization is shown below:
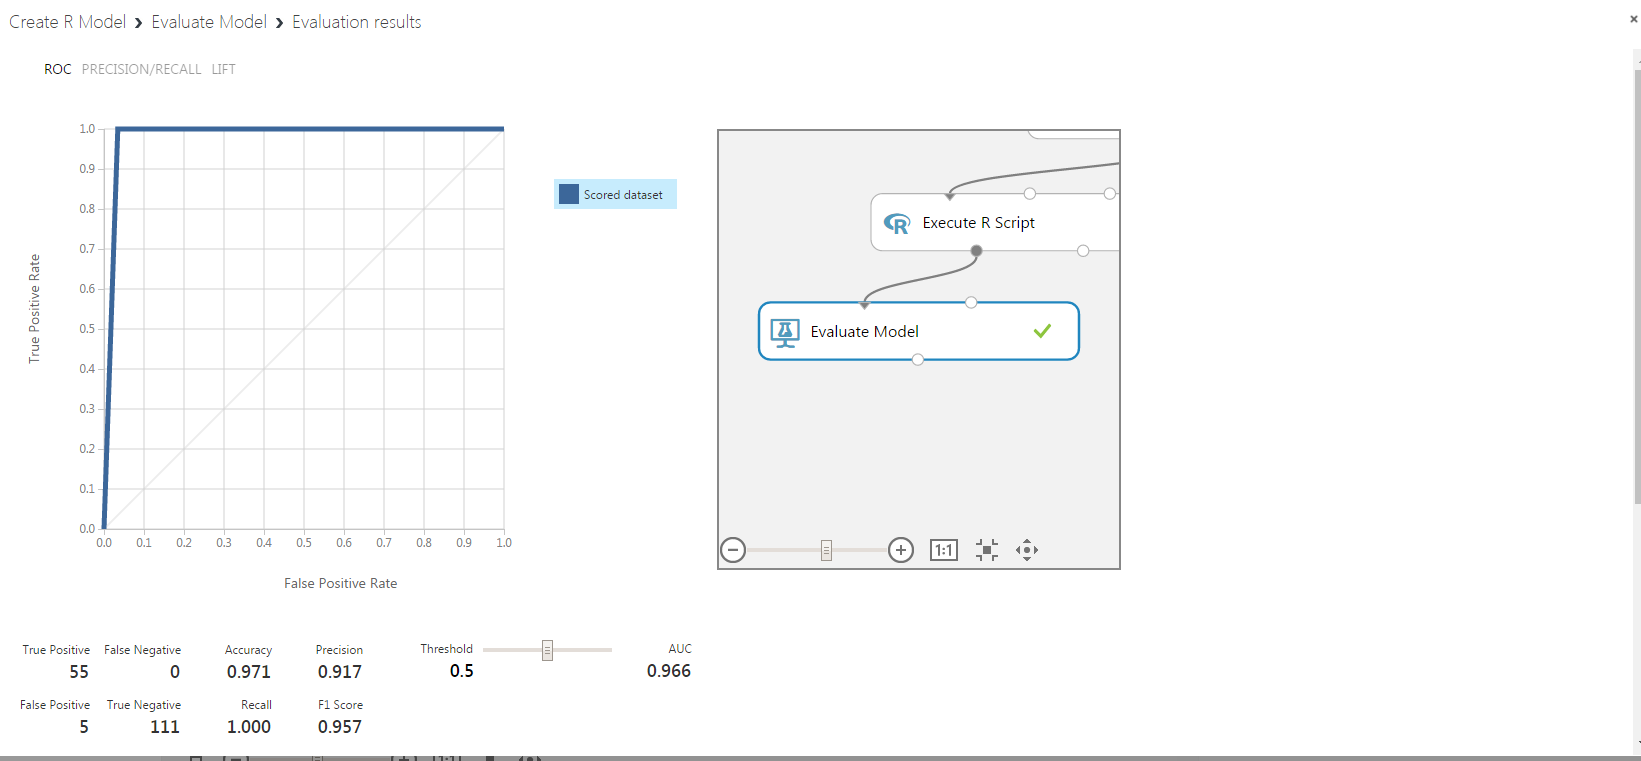
This is the ROC curve alright. We got the same figure from the Execute Python Script output. There is a huge difference though, as the result of Evaluate Model is interactive and the user can try different threshold combinations on the fly.
The R code provided above is tailored for the specific example; nevertheless, it is easily customized by identifying the corresponding columns and making the appropriate modifications. Moreover, we can even integrate this code into the ‘Scoring Script’ part of our Create R Model module, hence eliminating the extra Execute R Script module altogether (we leave this as an exercise for the interested reader).
Application: Comparing against native Azure ML Studio algorithms
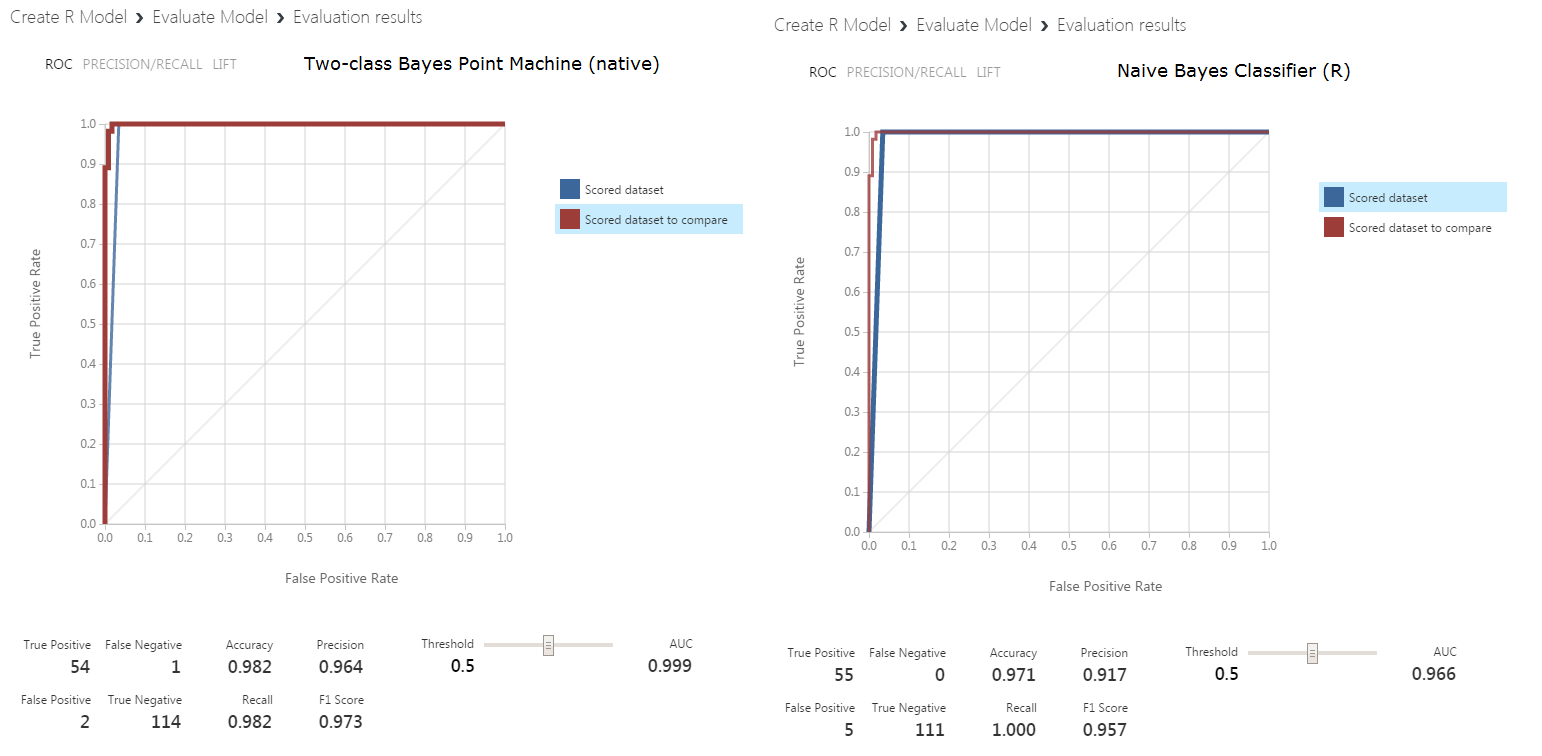
To demonstrate the usefulness of our workaround, we extend the existing experiment by adding a separate training workflow starting from a native Azure ML Studio algorithm. We then attach this secondary flow to our Evaluate Model module and perform a comparison. We have selected the native Two-Class Bayes Point Machine, and the experiment now looks like the figure below:
We can run the experiment and visualize the output of the Evaluate Model. In the figure below we present the two results side by side :
Summary
We have presented a workaround to connect scoring results from a Create R Model module to an Evaluate Model module in Azure ML Studio. This connection is not allowed in the current version of Azure ML Studio, and model evaluation has to be performed manually by user written scripts. The workaround consists of a rather simple R script that can be added in the existing ML pipeline between Score Model and Evaluate Model, altering the metadata of the scored dataset. With this modification, Azure ML Studio users can enjoy uniform evaluation of both native and custom machine learning models.
- Nonlinear regression using Spark – Part 2: sum-of-squares objective functions - October 31, 2016
- How to evaluate R models in Azure Machine Learning Studio - August 24, 2016
- Nonlinear regression using Spark – Part 1: Nonlinear models - February 10, 2016
[…] article was first published on R – Nodalpoint, and kindly contributed to […]
[…] article was first published on R – Nodalpoint, and kindly contributed to […]
I’m sure these be done in R alone.
Constantinos,
Thanks for the great article – I think this might be just the solution I was looking for. Any chance you could publish the experiment for me to use as a starting point in Azure ML Studio?
Thanks,
Sohrab
Dear Constantinos,
great post, helped me a lot. Do you also know the right metdata annotations for a regression model. I tried to “guess” the feature channel and score type attribute values (e.g., regression score, numeric score), but did not succeed.
Best,
Oliver
Thanks so much for writing this. I was banging my head against a wall trying to find out how to use Evaluate Model on some scores I imported from a different source, and this helped me figure out how to tag those scores as the Assigned Labels.