Ansible is the leading tool for configuring software and various parameters on servers. It does not require agents and other software installed on nodes like other popular tools (puppet or chef). Also, it is modular and already has hundreds of modules that help us configure our servers in several ways. In this article I will demonstrate how we can install an Oracle 12c R1 Database (12.1.0.2) in CentOS 7.1 server. The same Ansible playbook can be used with Redhat Enterprise Linux 7.1 and Oracle Linux 7.1. You can download the code from Github at:
https://github.com/cvezalis/oracledb-ansible
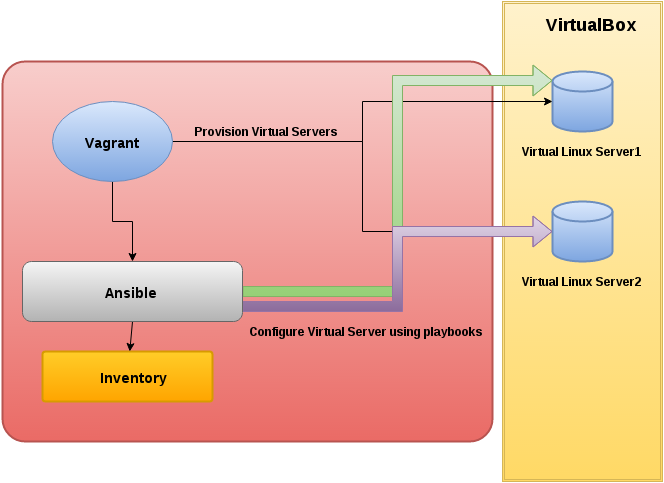
Source code also includes configuration for automatically provision a virtual machine using Vagrant.
Download from Oracle support the Oracle installation files:
– linuxamd64_12102_database_1of2.zip
– linuxamd64_12102_database_1of2.zip
and put them into the folder roles/oracle-install/files inside checkout folder
After that, go into checkout folder and execute :
$ vagrant up
After a few minutes a virtual machine with Oracle Database installed will be ready, without any further configuration. You can access the Enterprise Manager Express using sys/sysdba and “oracle” as password.
https://oradb3.private:5500/em
You can shutdown the virtual machine using:
$ vagrant halt
You can destroy it (delete it from disk) using:
$ vagrant destroy
Playbook in details
The main playbook is oracle-db.yml. You can execute it using:
$ ansible-playbook oracle-db.yml
If you do not use Vagrant you need a RHEL/CentOS/Oracle Linux 7.1 server with minimal installation, basic network configuration (ip/gateway/hostname/hosts/dns) and the root password. You can configure your host settings (hostname/ip, private key, username etc) in ansible.cfg and hosts files. Check Ansible documentation for more information about how to configure your inventory for one or more servers.
Playbook has 2 main sections:
1. vars_files. Is the section for configuring all installation parameters.
vars_files:
- infra-vars.yml
- db-vars.yml
- secrets.yml
In secrets.yml you can put the passwords used through playbook. db-vars.yml contains variables in the sense of constants and you may not change them. The infra-vars.yml file contains the infrastructure parameters which can be configured to adapt to your needs. The following table lists the variables you can configure:
oracle_user: The user that will run the software and the user who will perform the installation and configuration. Default value: oracle
oracle_install_group: The group that owns the software. Default value: oinstall
extra_groups: By default dba and oper
oracle_base: The base directory that hosts installation and software and data. Default is /oracle/app. Another example from Oracle documentation is /u01/app
installer_archives: The location of the installer files. You can change them if you download other version of R1 database
dbhome_name: The folder name of the database instance that installer will create
oracle_edition: The Edition of the database that will be installed. EE (Enterprise edition) by default
oracle_dba_group: The operating system group with dba role
oracle-oper_group: The operating system group with oper role
oracle_database_type: GENERAL_PURPOSE by default
oracle_globalname: The database global name
oracle_sid: The sid of the database
oracle_conf_as_container_db: True/false. If database will be a container database
oracle_pdb_name: The pluggable database name
oracle-charset: The character set of database. Default value is: AL32UTF8
oracle_memory_option: Boolean. Enable or disable Automatic Memory Management
oracle_memory_mb: Memory target for database in MB.
oracle_install_samples: Boolean. Install sample schemas when configuring the database
oracle_management_option: DEFAULT for Database Express and CLOUD_CONTROL for Enterprise Manager Cloud Control
oracle_enable_recovery: Boolean. Enable or disable database recovery
oracle_storage_type: FILE_SYSTEM_STORAGE for filesystem storage type. ASM is not supported in this playbook. I will add in a future release
oracle_dataloc: Full path to a folder that Oracle will be storing datafiles
oracle_recoveryloc: Full path to a folder that Oracle will be storing the fast recovery area
oracle_decline_security_updates: Yes by default for playbook. Installer will not install security updates from internet
hugepages_nr: Number of hugepages for the operating system. Consult documentation on how to find the correct value.
Oracle installation response files include more parameters, that i will add in a future release a playbook.
The second section contains the roles playbook will execute:
roles:
- role: linux-oracle
- role: oracle-install
sudo_user: '{{ oracle_user }}'
Playbook role: linux-oracle
This is the role for preparing the operating system for oracle installation. Lets examine the sections of linux-oracle role:
# ==> Configure Linux
- name: Install required libraries
yum: name={{ item }} state=present
with_items: packages_list
- name: Disable SELinux
selinux: state=disabled
- name: Disable Firewall Deamon (firewalld)
service: name=firewalld state=stopped enabled=no
- name: Change kernel parameters
sysctl: name="{{ item.key }}" value="{{ item.value }}" state=present
with_dict: kernel_params
The first section will install the required libraries the minimal Oracle Linux 7 is required for support Oracle Database 12c installation. Variables for this section is from roles/linux-oracle/vars/main.yml. The next modules disable the Security-Enhanced Linux and firewall. If you need firewall enabled you can enable it with this module but you also need to open the required ports for firewall using an Ansible module like firewalld. Consult Oracle Documentation for required ports and Ansible documentation for opening ports on Oracle Linux 7.1. The final section configures linux kernel parameters for Oracle Database.
Next, the role has a couple of tasks for creating oracle user and group:
# ==> Create users and groups
- name: Create groups
group: name={{ oracle_install_group }} state=present
- name: add extra groups
group: name={{ item }} state=present
with_items: extra_groups
- name: Create user
user: name={{ oracle_user }} group={{ oracle_install_group }}   password={{ oracle_os_user_pass }}
- name: Add extra groups
user: name={{ oracle_user }} groups={{ item }} append=yes
with_items: extra_groups
Then, the role creates user limits for oracle user:
- name: Add oracle user limits
lineinfile: dest=/etc/security/limits.conf line='{{ oracle_user }} {{ item.limit }} {{ item.type}} {{ item.value }}'
with_items:
- { limit: 'soft', type: nofile, value: '{{ soft_no_file }}' }
- { limit: 'hard', type: nofile, value: '{{ hard_no_file }}' }
- { limit: 'soft', type: nproc, value: '{{ soft_nproc }}' }
- { limit: 'hard', type: nproc, value: '{{ hard_nproc }}' }
- { limit: 'soft', type: stack, value: '{{ soft_stack }}' }
- { limit: 'hard', type: stack, value: '{{ hard_stack }}' }
- { limit: 'soft', type: memlock, value: '{{ soft_memlock }}' }
- { limit: 'hard', type: memlock, value: '{{ hard_memlock }}' }
These limits refer to the number of open files, number of processes, stack size and memlock for huge pages.
Subsequently playbook creates the main folder for oracle installation.
# ==> Create Base directories
- name: Create Oracle Base directory
file: state=directory path={{ oracle_base }} owner={{ oracle_user }} group={{ oracle_install_group }}
Transparent HugePages can cause memory allocation delays at runtime according to the Oracle Database documentation here
The following section disables them:
# ==> Disable transparent hugepages
- name: Copy script
copy: src=disable_trans_hugepages.sh dest='~/disable_trans_hugepages.sh' mode=755
- name: Disable Transparent Huge Pages
shell: '~/disable_trans_hugepages.sh'
It executes a script that disables transparent huge pages using rc.local file.
Finally the role enables huge pages on Oracle Linux:
# ==> Configure huge pages
- name: configure kernel for hugepages
sysctl: name="vm.nr_hugepages" value="{{ hugepages_nr }}" state=present
tags:
- hugepages
A restart is required for system to set the correct value of huge pages. You can verify the settings using:
cat /proc/meminfo | grep HugePages
or in Oracle 12c you can view the alert log. At the beginning it has a nice informational message about huge pages and how Oracle Database uses them:
**********************************************************************
Wed Oct 21 12:53:19 2015
Dump of system resources acquired for SHARED GLOBAL AREA (SGA)

Wed Oct 21 12:53:19 2015
Per process system memlock (soft) limit = 1843M
Wed Oct 21 12:53:19 2015
Expected per process system memlock (soft) limit to lock
SHARED GLOBAL AREA (SGA) into memory: 1154M
Wed Oct 21 12:53:19 2015
Available system pagesizes:
4K, 2048K
Wed Oct 21 12:53:19 2015
Supported system pagesize(s):
Wed Oct 21 12:53:19 2015
PAGESIZE  AVAILABLE_PAGES  EXPECTED_PAGES  ALLOCATED_PAGES  ERROR(s)
Wed Oct 21 12:53:19 2015
4K       Configured               2               2        NONE
Wed Oct 21 12:53:19 2015
2048K              578             577             577        NONE
Wed Oct 21 12:53:19 2015
**********************************************************************
The above is a sample output from database alert log the playbook created using vagrant with my default settings. You can see that system has 578 available huge pages and database utilizes 577 of them and 1 is left for the operating system.
Playbook role: oracle-install
This role installs the Oracle Database 12c (12.1.0.2), creates the listener and the database. Let’s focus on some details.
- name: Create folder for installation files
file: state=directory path={{ installation_folder }}
# ==> Copy installer files
- name: Copy installer files
copy: src={{ item }} dest='{{ installation_folder }}/'
with_items: '{{ installer_archives }}'
# ==> extract files
- name: Extract installation files
command: 'unzip {{ installation_folder }}/{{ item }} -d {{ installation_folder }}/'
with_items: '{{ installer_archives }}'
This part of playbook creates the installation folder, copies the installation archives and extract them.
In the next section we do the actual installation using a response file:
# ==> generate response file
- name: Gerenerate the response file for software only installation
template: src=db_install.rsp.j2 dest={{ installation_folder }}/db_install.rsp
# ==> execute installation
- name: Install Product
command: '{{ installation_folder}}/database/runInstaller -silent -ignorePrereq -ignoreSysPrereqs -waitforcompletion -responseFile {{ installation_folder }}/db_install.rsp'
# ==> execute Inventory command as root
- name: Execute Inventoty root command
command: '{{ inventory_location }}/orainstRoot.sh'
sudo_user: root
# ==> execute DB home command as root
- name: Execute DB home rfoot command
command: '{{ oracle_home }}/root.sh'
sudo_user: root
At first we generate the response file using j2 templates and copy the result to the installation folder. After the creation of the response file we execute Oracle Database installer using some parameters for not loading the graphical user interface and get the parameters to perform silent installation. This is a first time installation and oracle needs us to run 2 commands as root. The two command modules do the following.
- name: copy listener response file
template: src=netca.rsp.j2 dest={{ installation_folder }}/netca.rsp
- name: Create listener using netca
command: '{{ oracle_home }}/bin/netca -silent -responseFile {{ installation_folder }}/netca.rsp'
In this part we create the oracle listener using the default settings and network configuration assistant (netca). First we generate the response template for listener installer, then we copy it to installation folder and finally we execute it for creating the listener.
After listener creation we can execute the database configuration assistant (dbca) for creating a database instance.
- name: copy response file for dbca
template: src=dbca.rsp.j2 dest={{ installation_folder }}/dbca.rsp
- name: create database
command: '{{ oracle_home }}/bin/dbca -silent -responseFile {{ installation_folder }}/dbca.rsp'
The next section will create environment variables for Oracle user:
- name: create oracle home variable
lineinfile: dest='/home/{{ oracle_user }}/.bashrc' line='export ORACLE_HOME={{ oracle_home }}'
- name: create oracle sid variable
lineinfile: dest='/home/{{ oracle_user }}/.bashrc' line='export ORACLE_SID={{ oracle_sid }}'
- name: add oracle home bin folder
lineinfile: dest='/home/{{ oracle_user }}/.bashrc' line='export PATH=$PATH:$ORACLE_HOME/bin'
This contains useful database tools like sqlplus and lsnrctl.
- name: change oratab
lineinfile: dest='/etc/oratab' regexp='^{{ oracle_sid }}:{{ oracle_home }}:N' line='{{ oracle_sid }}:{{ oracle_home }}:Y'
sudo_user: root
- name: copy init.d oracle script to /etc/init.d
template: src=oradb.j2 dest=/etc/init.d/oradb mode=750
sudo_user: root
- name: enable oradb script to run at startup
command: 'chkconfig --add oradb'
sudo_user: root
At the end we make some configuration for Oracle Database to autostart after a system restart. To do that we enable the instance we created in oratab and create a startup script for the database that will be execute every time the server starts.
This is in short the way my playbook will install Oracle Database 12c (12.1.0.2). In the next weeks I will improve it and add more parameters for installation and support for RAC and ASM. Stay tuned with my blog!
My github account also contains an Ansible playbook to provision and configure a WebLogic with Fusion Middleware infrastructure software. You can combine the two playbooks and create the database for storing WebLogic and Fusion Middleware repositories and have the full stack, database plus application server with software installed and running with zero configuration in zero time.
https://github.com/cvezalis/weblogic-ansible
You can find more of my posts at my blog at https://unversioned.blogspot.com

My areas of expertise are Oracle Middleware Products (WebLogic, ADF, SOA Suite), Linux, JAVA, JavaScript and DevOps.
- Using Ansible to install WebLogic 12c R2 and Fussion Middleware - November 9, 2015
- Using Ansible to configure an Oracle Linux 7.1 server with Oracle 12c R1 Enterprise Edition Database - October 22, 2015
- Ansible playbook to provision a WebLogic Fusion Middleware Domain on RHEL 7 - September 29, 2015